Hey! Normally I post on the 19th, but I wanted to get this out early in case anyone was looking for gift ideas.
Have you ever read The Art of Creative Magick by S. Connolly? It’s probably one of my favorite books. I have been drawing for as long as I can remember, but you can usually find me trying something new lately. This year I decided to make some ritual supplies out of clay. I’d like to share some of my experiments with you.
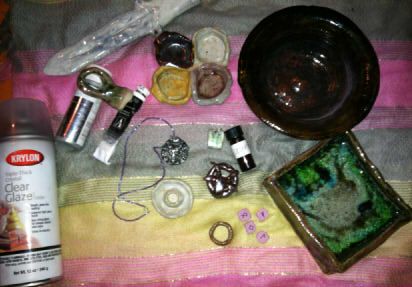
Materials
You can probably use sculpy, or any other readily available clay that you can get from the craft store. When I was fifteen or sixteen I made my first set of runes from play-doe. You can get really creative on a small budget. It’ll put your energy into the tools and you can even give them as gifts to loved ones.
I decided to use cone ten clay (that means you need a high-fire kiln to bisque/cook it.) because I have an abundance of it lying around right now. I cannot stress the importance of using the right clay with the right cooking apparatus. If you use low fire clay in a high fire kiln it will melt and ruin your kiln shelf (as well as anything else you have in the kiln). If you use high fire clay in your kitchen it’s not going to heat up nearly enough unless your oven reaches 2000+ degrees F. If you don’t bisque high fire clay it’s considered “bone dry” and will shatter. It also can’t be used with water because the water will liquefy your project.
Fabrication
Once you’ve read up about your clay, what you need to fire it, and have the materials gathered you can get to the fun part: making the ritual supplies. Below I’m going to describe the processes and materials used for making the supplies I have experience with.
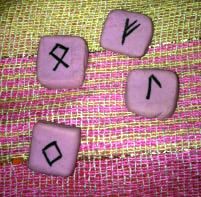
Runes
My first set of runes, as I said before, was a quick project from play doe. I simply took the clay, pinched it into the shapes I wanted, let them dry, and wrote on them in marker. The only advice I have if you’re going this route is to make sure they’re dry before you mark them. If you don’t the moisture seems to damage the marker. You can also use paint, blood, or a toothpick. It’s all really up to you.
I have personally never been fond of using a toothpick or awl to make marks in clay of any kind, because I find it’s difficult to clean the clay out of the indentations if you lack patience.
Pendants
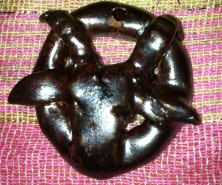
Pendants, to me, are the next step up from making runes. You can make pendants similar to your runes, or you can sculpt designs onto them. One of my favorite pendant projects is a Baphomet pendant I made in the spring.
I rolled the clay out into into a thin cylinder and then pressed it into a hollow circle. From there I made more cylinders and placed them inside of the hollowed circle in the shape of a star. After that I set aside two more cylinders for horns and sculpted the shape of a goat’s head. I pressed it onto the star and attached horns. If you’re using high fire clays, I recommend using slip (clay made more viscous with water) or scratching the clay and dabbing water on each piece to make just enough slip to attach the two pieces.
Now, that in and of itself works perfectly fine, but if you want to make it more intricate you can think of doing some of the following. You can roll a toothpick over the horns to give them a ribbed look, you can make little skulls to surround the outside, and/or you can treat the circle similarly to the horns and make the outside look ribbed as well. You can scratch texture into the Baphomet, even.
A really cute, simple way to make a skull for a small pendant is to roll a little circle from clay, poke two holes for eye sockets, and then poke in two sides of the circle to make the jaw.

The production for the first Baphomet is described above, and the second Baphomet was made with Rod’s Bod clay and glazed with temmoku. The silver shade was intentional, but this batch of temmoku glaze is normally used as black if applied thick. I’ll go into the glazing method for the first project later in this post.
Containers and bowls
If you plan on making something more ornate, I recommend using high fire clay. There’s really no way around using a more expensive type of clay, because otherwise your hard work might melt.
For an offering bowl you can do one of two things. You can make a pinch pot, or you can tackle the dreaded potter’s wheel.
Potter’s Wheel
Again, patience is a must. I had access to a potter’s wheel and it took me a couple weeks to make a cylinder without it collapsing. I still haven’t gotten the hang of the potter’s wheel, but I believe this type of project would take two years of experimentation to perfect. If you throw a piece too thick on the wheel, there’s the possibility it will crack (as mine did). The crack doesn’t look like it goes all the way through, but I’m still hoping my friend will find use for the bowl.
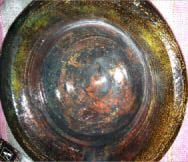
It was bisqued then raku glazed. Raku is a glazing method where you pull the piece from the kiln while it’s still molten hot and throw it into a container filled with combustible materials and closed to reduce oxygen. Raku fired materials probably shouldn’t be used to drink from because the glaze is typically made with lead. If you’re using glazes or paints at all, always be sure to find out about their chemical makeup so you’re not ingesting something harmful. Cadmium in cadmium red is toxic, but it’s one of my favorite acrylic paints to use in my art.}
Pinch Pots
Pinch pots on the other hand, as well as hand building square shapes, are a lot of fun. To make a pinch pot, you start with a ball of clay, insert your thumb into the center, and pinch the walls up as you go. Turn the piece as you pinch it for a more uniform look. You can burnish the clay with the back of a spoon to make it shiny without the need for glaze or paint.
You can even take one of your pendant designs and affix it to the front of the pot for a more ornate look.
Making a pinch pot would likely make for an interesting, completely custom sigil pot.
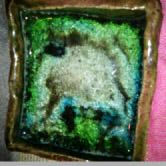
Boxes
For a square shape you’d just make slabs of clay and assemble them like a box with the clay and slip. I filled mine with a thin layer of green, blue, and clear glass to give it an interesting design at the bottom. The glass melted into a marbled pattern. I plan to house a set of runes in this box. On the note of glass, anything you decorate with glass should not be used to eat from. You can melt glass over statues if you connect them to the piece with glaze before you fire it, or with slip before you bisque it. I recommend asking before using glass if you plan on using more than a little bit.
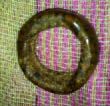
Rings
If you take a long, narrow slab of clay you can make rings. Roll them around your finger and leave a little space for shrinkage. This one is Rod’s Bod clay and slip. I smoothed the entire piece after fabrication to make it seamless. Decorate them with your sigil or enn of choice and enjoy. Or, if you want, try adding a stone to it. Faceted stone settings aren’t something I have any experience with, but bevel settings are as easy as making the setting, affixing it to the ring (or whatever project you’re making) then making a border so the stone can’t move or gluing the stone in after firing. Be sure to research the melting point of your stones, or a list of suitable stones to use for firing so you don’t end up with a mess! I’ve tried using Swarovski crystal in sculpy and it seemed to work, but I have not experimented enough with stone settings to help you more.
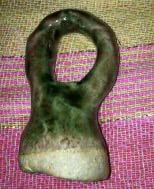
Ritual blades
I experimented with making a ritual blade. It’s Danish White, slightly heavy, and awkward, but it fits my hand perfectly and I know I’ll make great use of it. I wish I had made it more intricate, but it will serve its purpose well in my ritual tool kit for now. This was a particularly fun project. I started with two flattened slabs of clay. I rolled one up with my finger inside it to keep it hollow, then fashioned the other into a blade shape. From there, I made a small indentation in the blade and attached a base and a peg on the hilt to affix the two pieces together with slip. I flattened the hilt and left it open at the end so that it wouldn’t explode in the kiln. When it dried, I used a steel rib tool to shave off a bit of the clay to make it less thick and shape the blade. You could also try making it from one flattened slab of clay and shaping it to your hand. You would simply take the slab, roll the bottom portion into a hollow hilt, and then decorate the blade and hilt. Consider poking holes in the bottom to attach a bead or gemstone with wire.
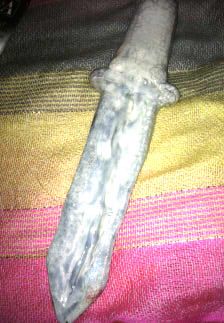
The glaze is a white crackle raku.
Incense burner
I have a big, beautiful, ornate cone incense burner, but I wanted to make something a little smaller and simple to work with. I simply cut out a circular shape from a cookie cutter, affixed a ball to it, and then pressed my incense into the circle and allowed it to dry. Definitely don’t let your incense dry in its holder. I had a bitch of a time trying to get it out, let me tell you. I haven’t tested it out yet, but another thing to consider is clay shrinkage. I have a feeling when I go to use it, there’s no way it will fit in the hole anymore.
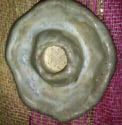
Candle snuffers
For this project I made a simple pinch pot and affixed a handle to it. I intended for the glaze to be red, but I didn’t do something right during the process and it turned out this red and green marbled color.
Since I plan on using this piece with fire, I did not glaze the inside.
Candle holders
I made a tealight candle holder with four directions on it to place at the center of my altar. This is a really simple project. I just rolled out circles, connected them together with slip, and pressing the candles onto the circles. I also made little tablets to go at each of the cardinal directions so I would know where to put which color glaze later. I used a personal color scheme, and again, there are my red and black glaze issues. I’d like to point out that all of the glazes I used were homemade and not commercial grade. I didn’t do a good enough job of mixing everything, I’m guessing.

Sculptures
The most complicated but rewarding experience from clay (in my opinion) is hand-building a sculpture. I don’t have a Demonolatry-specific example to show you, but I’d like to give some advice. If you’re making something from high fire clay, make sure it has a hole to expand and contract in the kiln so it won’t explode. I luckily didn’t have that problem with the sculptures I made, but it’s been known to happen. If you’re making something tall, give it a good, flat base to stand on, and try to use other pieces of clay to prop anything you want free standing so it retains its shape without drooping, or use wire armature on the inside. Keep in mind that the thicker you make something, the more time you’ll need to let it dry. If you don’t the outcome could possibly be a partially bisqued project, cracking, or shattering.
Extra ideas for decoration and fabrication
Precious Metal Clay
There’s another type of clay that I’d really like to work with called precious metal clay. It’s basically just silver, bronze, copper, or gold powder suspended in a liquid. It’s really expensive, so you should practice with cheaper materials first, but if you find that making pendants is your calling I’d highly recommend trying the stuff. After you bisque it all you have left is a one of a kind, pure metal piece. Imagine making Goetic sigil runes out of their corresponding metals? How cool would that be? Or you could make molds to make matching pendants for your coven. Or family heirlooms. Ah, yes, I dream of kilns and precious metal clay these days.
Patina
I also promised I would talk about the treatment for the baphomet pendant I showed at the beginning of the post. I’m a sucker for patina on metal. I painted the piece black, allowed it to dry, and then painted it with silver craft paint and wiped it off until I liked the result. The final coat is a no-fire clear glaze to keep the acrylic from melting away since I live in the desert. If you’re lucky enough to be working with precious metal clay, you can use acid in indentations to achieve a controlled patina. I can’t help you much with chemicals, but there are guides for the processes readily available online. If you want to patina the entire piece, you can easily oxidize silver using a boiled egg. Boil the egg and throw it into a plastic bag while it’s still hot. Crush it, and then quickly throw your silver piece in with it. Seal the bag and wait for a few minutes or hours depending on how dark you want it. I’ve done this for handmade chains and it looks gorgeous every time. Silver plated materials don’t turn out as well. The last time I used some silver plated wire it just turned brown.
Mixing Oleum in Clay
The most important fabrication idea I’d like to talk about is perfect for sculpy, but I have not tried it with high fire or play doe clays. Try mixing tincture, oleum or ash (I still need to try this last one myself) into your clay. It takes a little extra care to work it in so it isn’t greasy, and it might burn more easily if you’re not careful, but it’s worth it. I made a Leviathan sigil from sculpy and oleum in the shape of the sigil itself. I haven’t gotten around to finishing its paint job yet, but I took out the disk entirely and simply sculpted the sigil as best I could. It’s a great alternative to circular or square pendants. For free floating elements in sigils, try using jump rings, and stones with holes in them to attach dangling stones.
I hope you enjoyed this adventure through ritual tool making and I apologize for not having more pictures to share for the steps involved in the production of each project mentioned.
Thanks for reading! If you make anything or have more ideas, please share in the comment section below.
I wish you good health, safety, and joy over the holidays!
Wonderful!!! Love the Baphy pendant 🙂